Friday, August 19, 2016

ViewState

  • Track the values in the Controls. 
  • You can add custom values to the view state. 
  • It is used by the Asp.net page framework to automatically save the values of the page and of each control just prior to rendering to the page. When the page is posted, one of the first tasks performed by page processing is to restore view state. 
  • Viewstate enable and disabled at application level (web.config), page and control.
ViewState is more secure than hidden field, although viewstate internally will store with hidden field.
  • It is page-level State Management, it page only, cannot cross page.
  • Can store any type of data 
  • For Small Size Data only (Simple Data)
  • No Server Resource, within a page
  • Support Encryption Decryption
  • Can store object  or List of object (but need to serialize the class)
  • No Time out.
  • base64 encoded
Disadvantage
  • It does not have any support on mobile devices
  • it can seen in page (source), you need extra code to encrypt it.
  • Sore a large value will cause page slow.
Using ViewStateMode
  • Disable viewstateMode at Parent, Enable it at child level –> Works well
  • Enable viewstateMode  at Parent, Disable it at child level –> Works well
Using EnableViewState
  • Disable EnableViewState at parent, Enable it at child –> Does not work
  • Enable EnableViewState  at parent, Disable it at child –> Works well

Hidden fields

Store value in an HTML without display it in the user's browser. E.g. Store EmployeeID
ViewState and HiddenField data will lost when navigate away from the page, does not any clean up task.
  • Store as String
  • able to Get or Set the value
  • Maintain across postback
  • accessible to client-side scripts (javascript)
Disadvantage :
  • Hidden field data can be seen in page source.
Difference ViewState and HiddenField is :
Viewstate has 64 based encoding

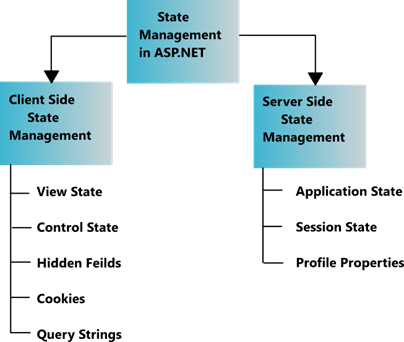
State Management


Advantages of Client – Side State Management: 

Better Scalability
  • With server-side state management, each client that connects to the Web server consumes memory on the Web server. If a Web site has thousands of simultaneous users, the memory consumed by storing state management information can become a limiting factor. Pushing this burden to the clients removes that potential bottleneck.
Supports multiple Web servers

  • With client-side state management, you can distribute incoming requests across multiple Web servers because the client provides all the information the Web server needs to process the request. With server-side state management, if client switches servers in middle of the session, the new server does not have client’s state information. 
  • Solution : You can use multiple servers with server-side state management, but you need either intelligent load-balancing (to always forward requests from a client to the same server) or centralized state management (where state is stored in a central database that all Web servers access). 

________________________________________________________________________

Advantages of Server – Side State Management:
Better security
  • Client-side state management information can be captured (either in transit or while it is stored on the client) or maliciously modified. Therefore, you should never use client-side state management to store confidential information, such as a password, authorization level, or authentication status. 
Reduced bandwidth

  • If you store large amounts of state management information, sending that information back and forth to the client can increase bandwidth utilization and page load times, potentially increasing your costs and reducing scalability. The increased bandwidth usage affects mobile clients most of all, because they often have very slow connections. Instead, you should store large amounts of state management data (say, more than 1 KB) on the server. 

Thursday, August 18, 2016

*.aspx, *.aspx.cs, *.aspx.designer.cs. / AutoEventWireup / Code file / Behind

.aspx is markup file. Contains things such as HTML, CSS, JavaScript, and ASP markup.(run on client side)

.aspx.cs is codebehind file. (run on server side)

.aspx.designer.cs 
is files are the bridge for code-behind files and the .aspx markup files. 
  • Any server control existing on the .aspx markup page is represented here.
  • Most important are the name and type of the server control
  • allows Visual Studio to give the user IntelliSense in the code-behind page for server controls created at design-time.
_________________________________________________________________________

.aspx page have 2 models (same function, same perfomance):
  •  Single-File page model
  • Code-behind page model
Code Behind Page Model
  • keep the markup in 1 file, programming code in another file (*.cs)
  • Clean separation of the markup (user interface) and code. 
  • It is allow designer working on the markup while a programmer writes code.
Single File Page Model Consist below in aspx :
  • You can see the code and the markup in one place.
  • Easy deploy and send to another programmer, because only 1 File.

<script runat="server">
void Button1_Click(Object sender, EventArgs e) 
{ 
    Label1.Text = "Clicked at " + DateTime.Now.ToString(); 
}</script>


_________________________________________________________________________


<%@ Page Language="C#" AutoEventWireup="true" CodeBehind="Default.aspx.cs" Inherits="Q14Cookies.Default" %>

AutoEventWireup 

  • True : Page Event has initialized automatically. 
  • False : Page Event initialize manually.

override protected void OnInit(EventArgs e)
{
    this.Load += new System.EventHandler(this.Page_Load);
}

Inherits
  • Carry the class name which inside the code behind file.
  • You can have mutiple classes in same code behind file and inherit in 2 different .aspx file.
CodeBehind
  • Need to compile in Visual Studio before deploy.
  • The compiled binary is placed in the bin folder.
  • Source code is not view able as plain text. (good to deliver to customer)
  • For Web Application.
CodeBehind
  • Need the .cs physical file at deployment folder.
  • Source code (.cs) is view able as plain text.
  • For Web sites project.

HTTP Modules and HTTP Handler

Every user requests to the IIS web server through the HTTP Pipeline (HTTP modules and HTTP handlers) to process the request.

Inject the logic before page is requested. such as URL Rewrite, authentication.


Modules are called before and after the handler executes. Modules enable developers to intercept, participate in, or modify each individual request. Handlers are used to process individual endpoint requests. Handlers enable the ASP.NET Framework to process individual HTTP URLs or groups of URL extensions within an application. Unlike modules, only one handler is used to process a request”.

________________________________________________________________________

HTTP Modules

Process in every request to the application. Filter (examine) incoming request.
Inject functionality for all coming requests e.g. URL rewrite or security.
regardless extension and take action based on the request. 


Advantages Of Http Modules
  • HTTP modules can be added at the site, folder, or file level as opposed to ISAPI filters, which could only be added at the global or site level
  • Can be reuse across application.
Use For :
  • Custom headers and footers
  • Custom caching and session handling mechanism
  • Gater Statistics and logging for every page request
  • Converting http to https and vice versa
  • User authentication etc.
Why not Global.asax ?
  • HttpModule can add to the GAC, and reuse them across many applications.
  • However HTTPModule don't have such session_start event
________________________________________________________

HTTP Handlers
Handle specific request on the basis of the extensions(aspx), we can define our custom HttpHandler for specific extension. e.g. (.gid .jpeg) 
Response to a request made to an ASP.NET Web Application based on extension (.aspx or .GIF)


Why we need to create our own HTTP Handler?
Use HTTP handler for images, we can increase performance by quicker response time to just show low level interface (e.g. image only) to avoid ASP.NET full page processing model such as (web page object, persisting view state etc.)
  • When to use ?
    • Display Image
    • RSS-formatted XML.
    • Perform ad hoc database query.
    • Return some binary data.
  • Default Handlers
    • .aspx - Handles web pages
    • .ascx - Handles user control pages
    • .asmx - Handles web service pages
    • .axd - Handles trace functionality
  • Custom HTTP handler by implement IHttpHandler Interface to synchronous handler, IHttpAsyncHander to create asynchronous handler.
<add verb="*" path="*.jpg" type="SimpleHTTPHanlder.ImageHandler,SimpleHTTPHanlder"/>
verb : HTTP Post or HTTP GET request
type : Handler ClassName, assembly DLL

HTTP handler process, it will not process if not .jpg
e.g. www.penyu.aspx/image1.jpg  

Wednesday, August 17, 2016

HTTP GET and HTTP Post

Hypertext Transfer Protocol (HTTP)

  • common protocol used for communication between web server and client(PC Browser).
  • Default port 80
  • Stateless
    • After request, server and client will forget each other, it will not remember the previous request
    • so state management will help (session, cookies)

HTTP Method : GET and POST

GET Request - get data from web server, by :
  • Click on a hyperlink
  • Response.Redirect()
  • Type URL
POST Request - submit data to the server, by :
  • Click a Submit button.
  • AutoPostback when drop down is changed.
IsPostback to check the request either Get(false) or POST(true).

GET
POST
Append data into URL.
Append data into message body.
Use for fetching data.
Use for process data.
Has length restriction, URL length maximum is 2048 characters
No length restriction.
Less Secure, data sent is part of URL.
More secure. No Logs or browser history can get
Not suitable for sensitive information (e.g. password)
Suitable for sensitive information.
Can Cache.
Not Cache.

HEAD
  • Same as GET, but it response the status line and the header section only. 
  • No body.
PUT 
  • Replace all the current representations of the target resource with the uploaded content.
  • Request server to store the entire body at location specified by the given URL.
DELETE 
  • Delete a file at location specified by the given URL.
CONNECT 
  •  Establish a network connection to web server over HTTP.
OPTIONS 
  • client use it to find out the HTTP methods and other options support by a web server.
  • client can specify a URL for the OPTIONS method, or * to refer to the entire server.
TRACE 
  • Perform a message loop back test along with the path to the target resource.
  • to echo the contents of an HTTP Request back to the requester which can be used for debugging purpose at the time of development.

Page Event

1. PreInit
  • Check the IsPostBack property and determines whether this is the first time the page is being processed. (IsPostback, IsCallback and IsCrossPagePostback properties have to set at this time.
  • For dynamic control.
  • Dynamically set the values of Themes.
  • Dynamically set the values Master Pages. (get error if you set masterpage after preinit)
  • You can get the Master Page Control Properties (but cannot get page control itself), but you can't get Master Page input value.
2. Init
  • This event fires after each control has been initialized. (TextBox != null)
  • Read and Initialize Control properties. (You can Get Button Colour or Change Button Colour)
  • Viewstate Restoration at here.
  • You can get the initialize value. (pre set Textbox.text = "123")
  •  You cannot get input value or postback value. (Same as MasterPage input value)
3. InitComplete 
  •  You can make changes to the view state. (Textbox = 123, this 123 will show in screen)
4. PreLoad 
  • Load Viewstate and Control.
  • Viewstate functionality starts retrieving their values. you can get value from viewstate
  • If you input 456 to textbox, and assign value to tetbox="123" , the screen will dispay the "123"
  • It receive value from Control. 
  • Postback data are now handed to the page controls.
5. Load
  • First place in page lifecycle that all values are restored.
  • Check the value of IsPostBack to avoid unnecessarily resetting state.
  • Check the value of IsValid. (Page.IsValid for checking validators such as  requiredFieldValidator, regularexpressionValidator , Range etc)
6. LoadComplete 
  • This event can be used when all the event processing has been done in the page.
  • Page_Load event will always happen before any control events get fired (Button_Click). If you need to do something after the control event, use LoadComplete or Page_PreRender.
7. PreRender
  • Last chance to change the page or control or viewstate before it turns into HTML stream.
8. PreRenderComplete
  • As the PreRender event is recursively fired for all child controls, this event ensures the completion of the pre-rendering phase.
  • Dispay in HTML
9. SaveStateComplete
  • State of control on the page is saved. Personalization, control state and view state information is saved, any changes will be ignore. (HTML will still display, but the value is not, next time u get the value , you will get value of PreRenderComplete or before )
  • The HTML markup is generated. 
10. UnLoad
  • The UnLoad phase is the last phase of the page life cycle. 
  • It raises the UnLoad event for all controls recursively and lastly for the page itself.
  • Final cleanup is done and all resources and references, such as closing opened File, database connections.